You are using an out of date browser. It may not display this or other websites correctly.
You should upgrade or use an alternative browser.
You should upgrade or use an alternative browser.
Raspberry pi toàn tập từ A-Z
- Bắt đầu phithien
- Ngày bắt đầu
Làm gì để chuyển RPI sang thẻ nhớ dung lượng nhỏ hơn?
Tôi có RPI trên thẻ 16GB, mỗi lần muốn dùng Win32DiskImager tạo bản sao lưu là mất 16GB lưu trữ, vừa lâu vừa tốn chổ, lại không thể dùng để tạo thẻ dung lượng nhỏ hơn, trong khi nội dung thật sự chỉ hơn 2GB.
Nếu ai có cách gì chỉ sao lưu phần data thôi và có thể phục hồi lại được trên thẻ trắng thì xin cho biết
Tôi làm thủ công rất phiền phức:
Chú thích
Tôi có RPI trên thẻ 16GB, mỗi lần muốn dùng Win32DiskImager tạo bản sao lưu là mất 16GB lưu trữ, vừa lâu vừa tốn chổ, lại không thể dùng để tạo thẻ dung lượng nhỏ hơn, trong khi nội dung thật sự chỉ hơn 2GB.
Nếu ai có cách gì chỉ sao lưu phần data thôi và có thể phục hồi lại được trên thẻ trắng thì xin cho biết
Tôi làm thủ công rất phiền phức:
- Resize patition /dev/mmcblk0p2 bằng gparted (mất hàng giờ)
- Sao lưu 2 partition /dev/mmcblk0p1 và /dev/mmcblk0p2 thành file bằng dd_rescue
- Chia partition trên thẻ mới dung lượng 4GB tương tự /dev/mmcblk0p1 và /dev/mmcblk0p2
- Copy các bản sao lưu vào thẻ mới bằng dd_rescue
Chú thích
- gparted chạy rất lâu
Mặc dù có thể copy partition bằng gparted nhưng quá tốn thời gian. Dùng dd_rescue phải qua 2 giai đoạn sao lưu - phục hồi nhưng tốn thời gian tương tự như đọc ghi bằng Win32DiskImager
- Backup bằng bằng dd_rescue cũng tiện như Win32DiskImager nếu không nói là tiện hơn
Ðề: Raspberry pi toàn tập từ A-Z
Chỉ làm thủ công vậy thôi chứ ko có cách nào bác ơi, vì muốn làm sao lưu từ partition lớn sang nhỏ thì chỉ có cách dùng gparted resize lại thôi, còn thẻ nhỏ sang thẻ lớn thì bác dùng clonezilla ấy. Lúc trước mình cũng sao lưu Raspbmc từ 4GB sang 2GB thủ công như bác. Mà mình dùng gparted trên ubuntu chạy nhanh lắm mà.
1. Dùng gparted để resize partition 2 thẻ 4G
2. dùng partimage để lưu partition 2
3. dùng dd để phục hồi file raspbmc nguyên gốc vào thẻ 2G
4. dùng partimage phục hồi partition 2 vào thẻ 2 G
phithien
Well-Known Member
Ðề: Raspberry pi toàn tập từ A-Z
Mấy bác dùng toàn thuật ngữ chuyên ngành em ko hiểu gì hết
Có cách nào sao lưu OS trên thẻ nhớ Rasp( Raspbian) ? Như tạo file ghost như win. Em hay dùng Rasp kéo torent nên lâu lâu thẻ nhớ lại bị lỗi, phải cài OS vô lại, lại mất công cài các phần mềm lại...
Mấy bác dùng toàn thuật ngữ chuyên ngành em ko hiểu gì hết
Có cách nào sao lưu OS trên thẻ nhớ Rasp( Raspbian) ? Như tạo file ghost như win. Em hay dùng Rasp kéo torent nên lâu lâu thẻ nhớ lại bị lỗi, phải cài OS vô lại, lại mất công cài các phần mềm lại...
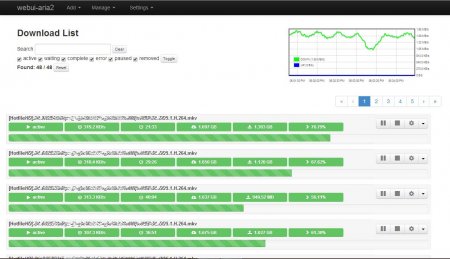
Giao diện web tuyệt vời cho aria2
Aria2 thì ai thường download đều biết, nhưng giao diện aria2web hay chương trình Aria2 remote control đều có nhiều nhược điểm.
Các bạn thử dùng WebUI-Aria2, sẽ có cảm nhận tuyệt vời, chuyên nghiệp. Thông thường aria2 tải được 70-80% băng thông tối đa, chậm hơn IDM nhưng cũng đủ nhanh.
File cấu hình aria2.conf
Aria2 thì ai thường download đều biết, nhưng giao diện aria2web hay chương trình Aria2 remote control đều có nhiều nhược điểm.
Các bạn thử dùng WebUI-Aria2, sẽ có cảm nhận tuyệt vời, chuyên nghiệp. Thông thường aria2 tải được 70-80% băng thông tối đa, chậm hơn IDM nhưng cũng đủ nhanh.
- WebUI-Aria2 là một gói ứng dụng web viết bằng PHP, chỉ cần xả vào thư mục web của RPI, không cần cài đặt.
- Mở ứng dụng bằng địa chỉ http://IP-RPI/tên-thư-mục-WebUI-Aria2

File cấu hình aria2.conf
Mã:
#
## aria2 config
#
# man page  = http://aria2.sourceforge.net/manual/en/html/aria2c.html
# file path = $HOME/.aria2/aria2.conf

# Download Directory: specify the directory all files will be downloaded to.
# When this directive is commented out, aria2 will download the files to the
# current directory where you execute the aria2 binary.
dir=/media/hdd1/ #-----<<<-------Nơi chứa file download, sửa lại cho đúng


# Bit Torrent: If the speed of the incoming data (download) from other peers is
# greater then the peer-speed-limit, then do not allow any more connections
# then max-peers. The idea is to limit the amount of clients our system will
# connect with to reduce our overall load when we are already saturating our
# incoming bandwidth. Make sure to set the the peer-speed-limit to your
# preferred incoming (download) speed. Speeds must be whole numbers so 5.5M is
# illegal but 5500K is valid.
 bt-max-peers=1
 bt-request-peer-speed-limit=5500K


# Bit Torrent: the max upload speed for all torrents combined. Again, only
# whole numbers are valid. WE find a global upload limit is more flexible then
# an upload limit per torrent.
 max-overall-upload-limit=2500K


# Bit Torrent: When downloading a torrent remove ALL trackers from the listing.
# This is a good way to only use distributed hash table (DHT) and Peer eXchange
# (PeX) on connections. We find start up of the torrent takes 60-120 seconds
# longer with all trackers disabled, but helps reduce the load on trackers.
#bt-exclude-tracker="*"


# Bit Torrent: ports and protocols used for bit torrent TCP and UDP
# connections. Peers use TCP. DHT and PEX as well as UDP based trackers use UDP
# and make sure the DHT server is enabled.
 dht-listen-port=6881
 enable-dht=true
 enable-peer-exchange=true
 listen-port=6881


# When running aria2 on FreeBSD with ZFS, disable disk-cache due to ZFS using
# Adaptive Replacement Cache (ARC). ZFS can also take advantage of the "sparse
# files" format which is significantly faster then pre allocation of file
# space. For other file systems like EXT4 and XFS you can test with "prealloc"
# and "falloc" to see which file-allocation allows arai2 to start quicker and
# use less disk I/O.
 disk-cache=0
 file-allocation=none


# Bit Torrent: fully encrypt the negotiation as well and the payload of all bit
# torrent traffic. Encryption is required and all old, non-encrypted clients
# are ignored. This may help avoid some ISPs rate limiting P2P clients, but may
# reduce the amount of clients aria2 will talk to.
 bt-min-crypto-level=arc4
 bt-require-crypto=true


# Bit Torrent: timeout values for servers and clients.
 bt-tracker-connect-timeout=10
 bt-tracker-interval=900
 bt-tracker-timeout=10


# Bit Torrent: Download the torrent file into memory (RAM) if there is no need
# to save the .torrent file itself. This option works with both magnet and
# torrent URL links.
 follow-torrent=mem


# Bit Torrent: The amount of time and the upload-to-download ratio you wish to
# seed to. If either the time limit ( seconds ) or the seed ratio is reached,
# torrent seeding will stop. You can set seed-time to zero(0) to disable
# seeding completely.
 seed-ratio=1.0
 seed-time=900


# Bit Torrent: scripts or commands to execute before, during or after a
# download finishes.
# on-bt-download-complete=/path/to/script.sh
# on-download-complete=/path/to/script.pl
# on-download-error=/path/to/script
# on-download-pause=/path/to/script.sh
# on-download-start=/path/to/script.pl
# on-download-stop=/path/to/script


# Event Multiplexing: set polling to the OS type you are using. For FreeBSD,
# OpenBSD and NetBSD set to "kqueue". For Linux set to "epoll".
 event-poll=epoll


# Data Integrity: check the MD5 / SHA256 hash of metalink downloads as well as
# the hash of bit torrent chunks as our client receives them. CPU time is
# reasonably low for the high value of verified data.
 check-integrity=true
 realtime-chunk-checksum=true


# File Names: Resume file downloads if we have a partial copy. Do not rename
# the file or make another copy if the same file is downloaded a second time.
 allow-overwrite=false
 always-resume=true
 auto-file-renaming=false
 continue=true
 remote-time=true


# User Agent: Disable the identification string of our client. If you connect
# to a server which requires a certain id string you can always add one here.
# Trackers should never use client id strings as security authentication or
# access control.
 peer-id-prefix=""
 user-agent=""


# Status Summery messages are disabled since the status of the download is
# updated in real time on the CLI anyways.
 summary-interval=0


# FTP: use passive ftp which is firewall friendly and reuse the ftp data
# connection when asking for multiple resources from the same server for
# efficiency.
 ftp-pasv=true
 ftp-reuse-connection=true


# Metalink: Set the country code to make sure mirrors closest to you are used
# first. Prefer more secure https mirrors over http and ftp servers.
 metalink-language=en-US
 metalink-location=us
 metalink-preferred-protocol=https


# Disconnect from https, http or ftps server who do not upload data to us
# faster then the specified value. Aria2 will then find another mirror in the
# metalink file which might be quicker. If there are no more mirrors left then
# the current slow mirror is still used. This value is NOT used for bit torrent
# connections though. NOTE: we hope to convince the developer to add a
# lower-speed value or even a minimal client U/D ratio to bit torrent some day
# to kick off leachers too.
 lowest-speed-limit=50K


# Concurrent downloads: Set the number of different servers to download from
# concurrently; i.e. in parallel. If we are downloading a single file then
# split that file into the same amount of streams. Make sure to keep in mind
# that if the amount of parallel downloads times the lowest-speed-limit is
# greater then your total download bandwidth then you will drop servers
# incorrectly. For example, we have ten(10) connections at a minimum of
# 50KiB/sec which equals 500KiB/sec. If our total download bandwidth is not at
# least 500KiB/sec then arai2 will think the mirrors are too slow and drop
# connection slowing down the whole download. Do not set the
# max-connection-per-server greater then one(1) as to avoid abusing a single
# server.
 max-concurrent-downloads=10 #--------<<<-------Số files download đồng thời
 max-connection-per-server=1
 min-split-size=5M
 split=10


# RPC Interface: To access aria2 through XML-RPC API, like using webui-aria2.
enable-rpc
rpc-listen-all
#rpc-user=username
#rpc-passwd=passwd


# Daemon Mode: To run aria2 in the background as a daemon. Use daemon mode to
# start aria2 on reboot or when using an RPC interface like webui-aria2.
daemon


#
#
# Reference: the following options are commented out and the developers
# defaults are used. We kept them here for reference.

# bt-max-open-files=100
# bt-save-metadata=false
# bt-stop-timeout=0
# bt-tracker="udp://tracker.openbittorrent.com:80/announce"
 check-certificate=true
 conditional-get=true
# dht-entry-point="dht.transmissionbt.com:6881"
# dht-file-path=$HOME/.aria2/dht.dat
# dht-message-timeout=10
# disable-ipv6=true
 http-accept-gzip=true
log=/var/log/aria2.log
log-level=debug

### EOF ###
Chỉnh sửa lần cuối:
Sao lưu lên trời
rPI trên thẻ nhớ nhỏ xíu có gì mà sao lưu?
Giải nén ra, ta có 3 thư mục armv6h, x86, x86_64. Để dùng trên rPI ta chỉ cần thư mục armv6h.
Trong thư mục armv6h có 2 file thực thi:
Chạy CopyCmd bằng crontab có thể giúp sao lưu nhiều thư mục rải rác trên mạng cục bộ một cách âm thầm và an toàn.
Hướng dẫn sử dụng có trên dòng lệnh
CopyCmd --help
Đăng ký copy.com với mã referer sẽ có được 20GB lưu trữ. Ngoài ra có thể giới thiệu chính mình để tăng lên 5GB một lần, chỉ cần email hợp lệ và máy ảo
rPI trên thẻ nhớ nhỏ xíu có gì mà sao lưu?
- Có thể sao lưu chính OS của rPI
- File trên hệ thống mạng nội bộ đều có thể mount vào rPI và sao lưu từ đó
- Phần mềm đồng bộ chỉ sao lưu tại thư mục mặc định, không thể sao lưu các thư mục nằm rãi rác
- copy.com có phần mềm sao lưu chạy trên rPI (chỉ có copy.com hổ trợ rPI)
Giải nén ra, ta có 3 thư mục armv6h, x86, x86_64. Để dùng trên rPI ta chỉ cần thư mục armv6h.
Trong thư mục armv6h có 2 file thực thi:
- CopyCmd: chạy lệnh API trên dòng lệnh
- CopyConsole: phần mềm đồng bộ chạy trên máy headless
Chạy CopyCmd bằng crontab có thể giúp sao lưu nhiều thư mục rải rác trên mạng cục bộ một cách âm thầm và an toàn.
Hướng dẫn sử dụng có trên dòng lệnh
CopyCmd --help
Đăng ký copy.com với mã referer sẽ có được 20GB lưu trữ. Ngoài ra có thể giới thiệu chính mình để tăng lên 5GB một lần, chỉ cần email hợp lệ và máy ảo
Chỉnh sửa lần cuối:
rPI: mount một thư mục Windows
Mount một/nhiều thư mục Windows trong rPI để tăng thêm dung lượng rPI, để dùng rPI như máy sao lưu, để chia sẻ tài nguyên...
Mount một/nhiều thư mục Windows trong rPI để tăng thêm dung lượng rPI, để dùng rPI như máy sao lưu, để chia sẻ tài nguyên...
- Thư mục Windows trong mạng LAN cần được share trước, thí dụ với tên share1, cho user usr nào đó, thí dụ như user đăng nhập Windows, cùng với mật khẩu pwd.
- Trong rPI tạo sẵn một thư mục, thí dụ /mnt/share1 dùng để mount thư mục Windows share1
- Các câu lệnh gõ trong rPI là
Mã:
mkdir /mnt/share1
mount -t ntfs //IP_máy_Windows/share1 /mnt/share1 -o username=usr,password=pwd
Chỉnh sửa lần cuối:
Ðề: Raspberry pi toàn tập từ A-Z
Khi download bằng aria2 bị failed nữa chừng, add lại link khác bằng webui-aria2 thì có thể resume được.
Còn khi mình add 2 link khác server của cùng một file thì có download được nhanh hơn không? (add bằng webui-aria2) - Không
Khi download bằng aria2 bị failed nữa chừng, add lại link khác bằng webui-aria2 thì có thể resume được.
Còn khi mình add 2 link khác server của cùng một file thì có download được nhanh hơn không? (add bằng webui-aria2) - Không
Chỉnh sửa lần cuối:
Ðề: Raspberry pi toàn tập từ A-Z
pyload tôi chưa dùng nên không biết gì
Chưa cài được aria2 webui? Trước hết anh test xem aria2 chạy ổn chưa?
Tốc độ download của aria2 thay đổi thất thường, có vẻ nó đặt ưu tiên thấp trong việc chiếm dụng băng thông, nếu có ai đó trong mạng nội bộ dùng băng thông cao thì aria2 failed.
Bí quyết để aria2 không failed liên tục là tốc_độ_download_tối_thiểu * số_link_download_đồng thời = băng_thông_tối_thiểu
Thí dụ:
Tốc độ thấp nhất của đường truyền nhà bạn là 200KB/s. Mở aria2.conf đặt
- lowest-speed-limit=40K
- max-concurrent-downloads=5
Tốc độ thấp nhất của đường truyền nhà bạn là 500KB/s.
- lowest-speed-limit=50K
- max-concurrent-downloads=10
Làm sao biết băng thông thấp nhất mạng của mình là bao nhiêu? Căn cứ vào cam kết của nhà mạng hay theo kinh nghiệm sử dụng
phithien
Well-Known Member
Ðề: Raspberry pi toàn tập từ A-Z
Anh viết 1 bài chi tiết cài đặt đi. em lam xong, điền ip. nhưng vẫn báo lỗi
Oh Snap! Could not connect to the aria2 RPC server. Will retry in 1 secs. You might want to check the connection settings by going to Settings > Connection Settings
ko biết còn thiếu bước nào ko
pyload tôi chưa dùng nên không biết gì
Chưa cài được aria2 webui? Trước hết anh test xem aria2 chạy ổn chưa?
Tốc độ download của aria2 thay đổi thất thường, có vẻ nó đặt ưu tiên thấp trong việc chiếm dụng băng thông, nếu có ai đó trong mạng nội bộ dùng băng thông cao thì aria2 failed.
Bí quyết để aria2 không failed liên tục là tốc_độ_download_tối_thiểu * số_link_download_đồng thời = băng_thông_tối_thiểu
Thí dụ:
Tốc độ thấp nhất của đường truyền nhà bạn là 200KB/s. Mở aria2.conf đặt
- lowest-speed-limit=40K
- max-concurrent-downloads=5
Tốc độ thấp nhất của đường truyền nhà bạn là 500KB/s.
- lowest-speed-limit=50K
- max-concurrent-downloads=10
Làm sao biết băng thông thấp nhất mạng của mình là bao nhiêu? Căn cứ vào cam kết của nhà mạng hay theo kinh nghiệm sử dụng
Anh viết 1 bài chi tiết cài đặt đi. em lam xong, điền ip. nhưng vẫn báo lỗi
Oh Snap! Could not connect to the aria2 RPC server. Will retry in 1 secs. You might want to check the connection settings by going to Settings > Connection Settings
ko biết còn thiếu bước nào ko
Ðề: Raspberry pi toàn tập từ A-Z
Giả sử login vào rPI với user root
1. Cài đặt aria2
2. Tạo file config
3. Tạo bash khởi chạy aria2
4. Đặt thuộc tính thực thi
5. Chạy aria2 khi khởi động
Xong rồi, thử chạy aria2
Nếu thấy có aria2 trên màn hình thì aria2 đã chạy
Giả sử login vào rPI với user root
1. Cài đặt aria2
Mã:
apt-get install aria2
Mã:
mkdir /root/.aria2
nano /root/.aria2/aria2.conf
Mã:
#
## aria2 config
#
# man page  = http://aria2.sourceforge.net/manual/en/html/aria2c.html
# file path = $HOME/.aria2/aria2.conf

# Download Directory: specify the directory all files will be downloaded to.
# When this directive is commented out, aria2 will download the files to the
# current directory where you execute the aria2 binary.
dir=[COLOR="#FF0000"]/media/hdd1/[/COLOR]  #nơi chứa file download, sửa lại cho đúng

# Bit Torrent: If the speed of the incoming data (download) from other peers is
# greater then the peer-speed-limit, then do not allow any more connections
# then max-peers. The idea is to limit the amount of clients our system will
# connect with to reduce our overall load when we are already saturating our
# incoming bandwidth. Make sure to set the the peer-speed-limit to your
# preferred incoming (download) speed. Speeds must be whole numbers so 5.5M is
# illegal but 5500K is valid.
 bt-max-peers=1
 bt-request-peer-speed-limit=5500K

# Bit Torrent: the max upload speed for all torrents combined. Again, only
# whole numbers are valid. WE find a global upload limit is more flexible then
# an upload limit per torrent.
 max-overall-upload-limit=2500K

# Bit Torrent: When downloading a torrent remove ALL trackers from the listing.
# This is a good way to only use distributed hash table (DHT) and Peer eXchange
# (PeX) on connections. We find start up of the torrent takes 60-120 seconds
# longer with all trackers disabled, but helps reduce the load on trackers.
#bt-exclude-tracker="*"

# Bit Torrent: ports and protocols used for bit torrent TCP and UDP
# connections. Peers use TCP. DHT and PEX as well as UDP based trackers use UDP
# and make sure the DHT server is enabled.
 dht-listen-port=6881
 enable-dht=true
 enable-peer-exchange=true
 listen-port=6881

# When running aria2 on FreeBSD with ZFS, disable disk-cache due to ZFS using
# Adaptive Replacement Cache (ARC). ZFS can also take advantage of the "sparse
# files" format which is significantly faster then pre allocation of file
# space. For other file systems like EXT4 and XFS you can test with "prealloc"
# and "falloc" to see which file-allocation allows arai2 to start quicker and
# use less disk I/O.
 disk-cache=0
 file-allocation=none

# Bit Torrent: fully encrypt the negotiation as well and the payload of all bit
# torrent traffic. Encryption is required and all old, non-encrypted clients
# are ignored. This may help avoid some ISPs rate limiting P2P clients, but may
# reduce the amount of clients aria2 will talk to.
 bt-min-crypto-level=arc4
 bt-require-crypto=true

# Bit Torrent: timeout values for servers and clients.
 bt-tracker-connect-timeout=10
 bt-tracker-interval=900
 bt-tracker-timeout=10

# Bit Torrent: Download the torrent file into memory (RAM) if there is no need
# to save the .torrent file itself. This option works with both magnet and
# torrent URL links.
 follow-torrent=mem

# Bit Torrent: The amount of time and the upload-to-download ratio you wish to
# seed to. If either the time limit ( seconds ) or the seed ratio is reached,
# torrent seeding will stop. You can set seed-time to zero(0) to disable
# seeding completely.
 seed-ratio=1.0
 seed-time=900

# Bit Torrent: scripts or commands to execute before, during or after a
# download finishes.
# on-bt-download-complete=/path/to/script.sh
# on-download-complete=/path/to/script.pl
# on-download-error=/path/to/script
# on-download-pause=/path/to/script.sh
# on-download-start=/path/to/script.pl
# on-download-stop=/path/to/script

# Event Multiplexing: set polling to the OS type you are using. For FreeBSD,
# OpenBSD and NetBSD set to "kqueue". For Linux set to "epoll".
 event-poll=epoll

# Data Integrity: check the MD5 / SHA256 hash of metalink downloads as well as
# the hash of bit torrent chunks as our client receives them. CPU time is
# reasonably low for the high value of verified data.
 check-integrity=true
 realtime-chunk-checksum=true

# File Names: Resume file downloads if we have a partial copy. Do not rename
# the file or make another copy if the same file is downloaded a second time.
 allow-overwrite=false
 always-resume=true
 auto-file-renaming=false
 continue=true
 remote-time=true

# User Agent: Disable the identification string of our client. If you connect
# to a server which requires a certain id string you can always add one here.
# Trackers should never use client id strings as security authentication or
# access control.
 peer-id-prefix=""
 user-agent=""

# Status Summery messages are disabled since the status of the download is
# updated in real time on the CLI anyways.
 summary-interval=0

# FTP: use passive ftp which is firewall friendly and reuse the ftp data
# connection when asking for multiple resources from the same server for
# efficiency.
 ftp-pasv=true
 ftp-reuse-connection=true

# Metalink: Set the country code to make sure mirrors closest to you are used
# first. Prefer more secure https mirrors over http and ftp servers.
 metalink-language=en-US
 metalink-location=us
 metalink-preferred-protocol=https

# Disconnect from https, http or ftps server who do not upload data to us
# faster then the specified value. Aria2 will then find another mirror in the
# metalink file which might be quicker. If there are no more mirrors left then
# the current slow mirror is still used. This value is NOT used for bit torrent
# connections though. NOTE: we hope to convince the developer to add a
# lower-speed value or even a minimal client U/D ratio to bit torrent some day
# to kick off leachers too.
[COLOR="#FF0000"] lowest-speed-limit=50K[/COLOR]

# Concurrent downloads: Set the number of different servers to download from
# concurrently; i.e. in parallel. If we are downloading a single file then
# split that file into the same amount of streams. Make sure to keep in mind
# that if the amount of parallel downloads times the lowest-speed-limit is
# greater then your total download bandwidth then you will drop servers
# incorrectly. For example, we have ten(10) connections at a minimum of
# 50KiB/sec which equals 500KiB/sec. If our total download bandwidth is not at
# least 500KiB/sec then arai2 will think the mirrors are too slow and drop
# connection slowing down the whole download. Do not set the
# max-connection-per-server greater then one(1) as to avoid abusing a single
# server.
 [COLOR="#FF0000"]max-concurrent-downloads=5
 max-connection-per-server=1
 min-split-size=5M[/COLOR]
 split=16

# RPC Interface: To access aria2 through XML-RPC API, like using webui-aria2.
enable-rpc
rpc-listen-all
#rpc-user=admin
#rpc-passwd=

# Daemon Mode: To run aria2 in the background as a daemon. Use daemon mode to
# start aria2 on reboot or when using an RPC interface like webui-aria2.
# daemon

#
#
# Reference: the following options are commented out and the developers
# defaults are used. We kept them here for reference.

# bt-max-open-files=100
# bt-save-metadata=false
# bt-stop-timeout=0
# bt-tracker="udp://tracker.openbittorrent.com:80/announce"
 check-certificate=true
 conditional-get=true
# dht-entry-point="dht.transmissionbt.com:6881"
# dht-file-path=$HOME/.aria2/dht.dat
# dht-message-timeout=10
# disable-ipv6=true
 http-accept-gzip=true
log=/var/log/aria2.log
log-level=debug

### EOF ###
Mã:
nano /etc/init.d/aria2
Mã:
#! /bin/sh
# /etc/init.d/aria2

### BEGIN INIT INFO
# Provides: aria2cRPC
# Required-Start: $network $local_fs $remote_fs
# Required-Stop: $network $local_fs $remote_fs
# Default-Start: 2 3 4 5
# Default-Stop: 0 1 6
# Short-Description: aria2c RPC init script.
# Description: Starts and stops aria2 RPC services.
### END INIT INFO

RETVAL=0
case "$1" in
start)
        echo -n "Starting aria2c daemon\n"
        umask 0000
        aria2c --daemon --conf-path=/root/.aria2/aria2.conf
        RETVAL=$?
        ;;
stop)
        echo -n "Shutting down aria2c daemon\n"
        killall aria2c
        RETVAL=$?
        ;;
restart)
        $0 stop
        sleep 3
        $0 start
        ;;
*)
        echo "Usage: $0 {start|stop|restart}"
        RETVAL=1
esac
exit $RETVAL
Mã:
chmod +x /etc/init.d/aria2
Mã:
update-rc.d aria2 defaults 99
Mã:
/etc/init.d/aria2 start
ps -e|grep aria2
Chỉnh sửa lần cuối:
rPI chạy trên SSD
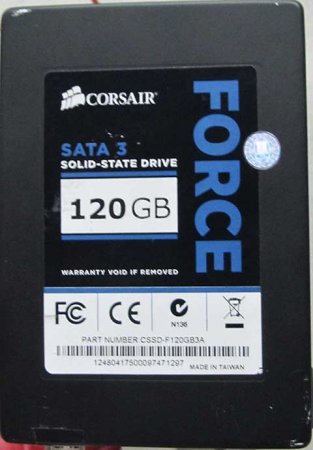
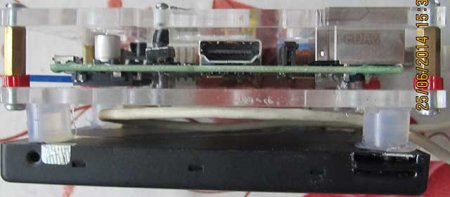
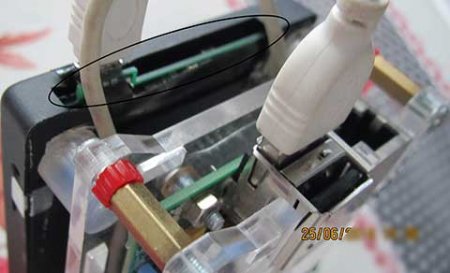
Kỹ thuật chuyển HĐH raspbian lên HDD chắc mọi người biết rồi. Tôi mod SSD cho vừa với rPI, gởi hình cho các bạn xem.
Vật liệu:
- rPI
- SSD
- Board HDD-USB lấy từ box 2.5
Đầu tiên mở SSD ra, đẩy board SSD xuống phía cạnh dưới chừa chổ cho board HDD-USB, lắp board HDD-USB vào SSD và đặt trở lại box của SSD. Tôi dùng board HDD-USB của Buffalo thì thừa khỏang 2mm cạnh bên, khoét box SSD cho vừa. Dán băng keo hay bắt vít board SSD xuống box, đậy nắp lại.
Cắt silicon làm chân, gắn SSD dính vào bên dưới rPI.
Cái hay là không cần cấp nguồn riêng cho SSD+board HDD-USB SSD dùng ít điện chăng?
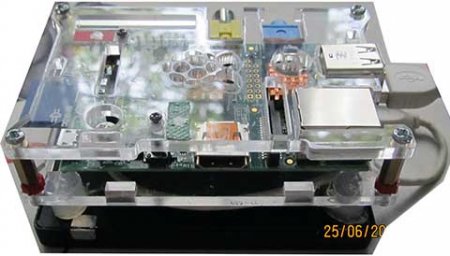
Kỹ thuật chuyển HĐH raspbian lên HDD chắc mọi người biết rồi. Tôi mod SSD cho vừa với rPI, gởi hình cho các bạn xem.
Vật liệu:
- rPI
- SSD
- Board HDD-USB lấy từ box 2.5
Đầu tiên mở SSD ra, đẩy board SSD xuống phía cạnh dưới chừa chổ cho board HDD-USB, lắp board HDD-USB vào SSD và đặt trở lại box của SSD. Tôi dùng board HDD-USB của Buffalo thì thừa khỏang 2mm cạnh bên, khoét box SSD cho vừa. Dán băng keo hay bắt vít board SSD xuống box, đậy nắp lại.
Cắt silicon làm chân, gắn SSD dính vào bên dưới rPI.
Cái hay là không cần cấp nguồn riêng cho SSD+board HDD-USB


ntquyet1802
New Member
Re: Ðề: Raspberry pi toàn tập từ A-Z
Bác cho em hỏi là dùng cái SSH này sao lại gọi là phá Rasp ạ? Hại lắm ạ?
Cũng là 1 cách để phá Rasp.
Bác cho em hỏi là dùng cái SSH này sao lại gọi là phá Rasp ạ? Hại lắm ạ?


